-
Server installation
-
Distributive choice
Last stable releases of our product for different platforms (more than 15 OS are supported) can be found here >.
Windows version installation
Distributive is simple zip-archive. To begin installation, you should run installer.exe:
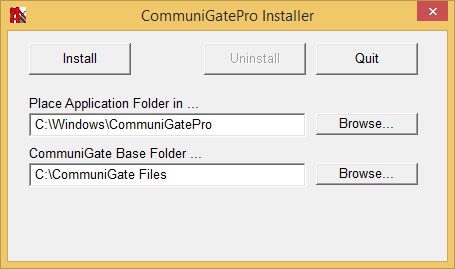
- Application Folder — folder with default program, settings and interface files.
- Base Folder — folder with user data and custom settings.
When you update program, only Application Folder is changed.
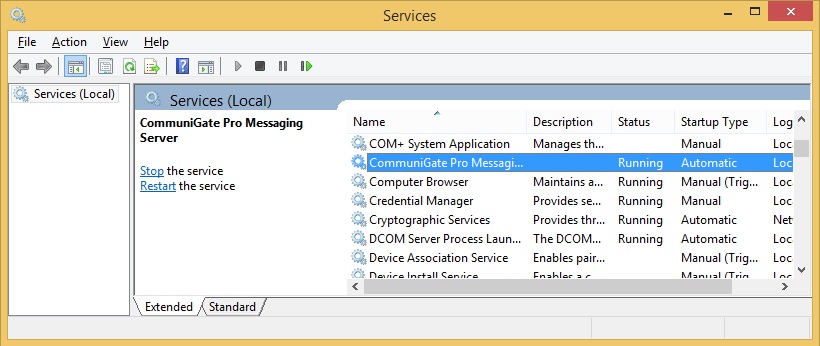
When installation is finished, you should check if CommuniGate services is running:
Main interface
Open this URL in any browser:
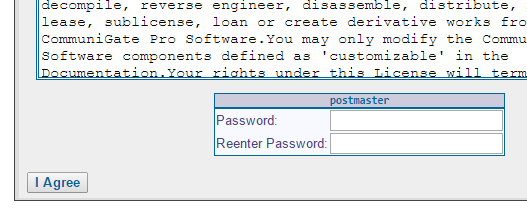
http://localhost:8010/ (or http://[ip address of your server]:8010/)You'll get in WebAdmin section.
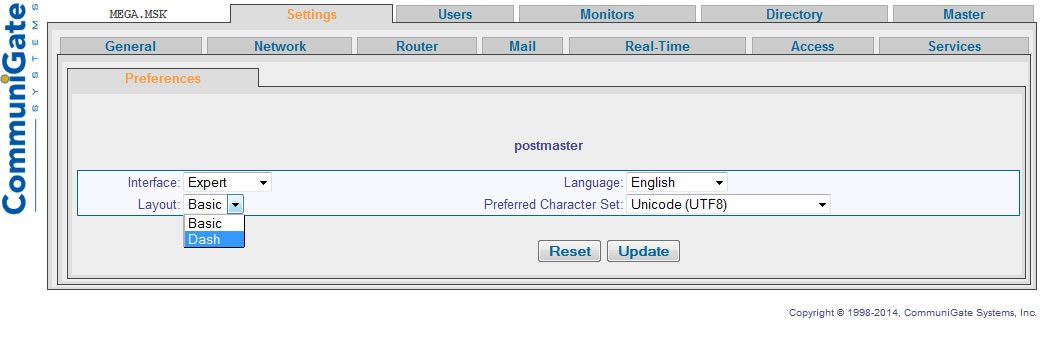
Default administrator is account named "postmaster". On the first log-in you should set password for this account:
After login with "postmaster" account, you'll get to the main settings page:
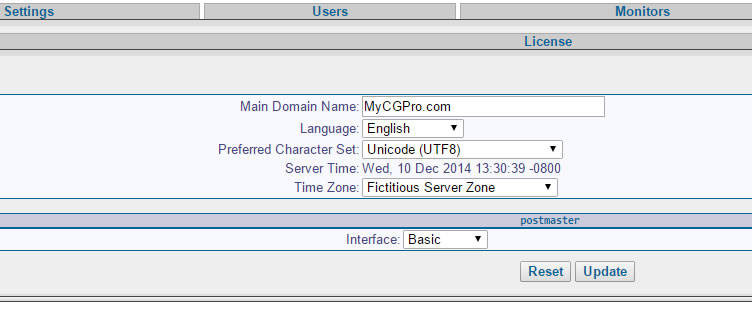
Here you can choose interface language, time zone, and main domain name. We are strongly recommend to switch from "Basic" interface to "Expert". More settings will show in "Expert" mode, but "Basic" mode is good for independent study.
WebAdmin is hierarchical tabs system. For indication of any setting we'll use these format:
Tab1->Tab2->Tab3->«Setting Name»
For example, to create user, you should use button
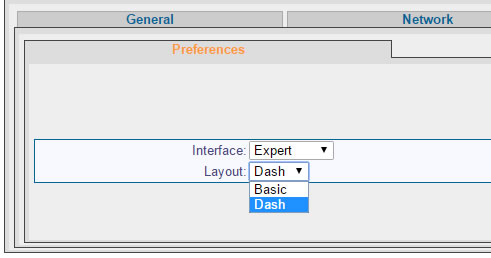
Users->Domains->[Domain Name]->«Create Account» .Starting from version 6.1c.1, there is an option to switch on the new Administrator interface. To change interface, on the page WebAdmin->Settings (or Users, or Monitors) you'll need to click on the Preferences (bottom right corner) and in "Layout" field choose "Dash". Then click "Update". To switch back to the original interface, choose "Basic" in "Layout" field.
Besides WebAdmin, there is 3 another web-interfaces for users:
- WebUser — HTML-interface with mail, calendars and contacts. By default, available on port 8100:
http://localhost:8100/ - Pronto! Flash — more functional Flash interface. Besides mail, calendars and contacts, you can use voice calls, IM and some other additional functions. Available at URL like:
http://localhost:8100/Pronto/ - Pronto! — newest minimalistic interface, based on HTML 5. Available at URL:
http://localhost:8100/hPronto/
With this installation is finished. Users can make calls to each other and write messaged using IM or mail. But you should remember, if you don't have DNS-names, you should use IP-addresses of your server in client settings, and for voice calls, you'll need to use full account name, because short numbers wasn't set yet.
Important: by default, in Pronto Flash, all incoming calls are disabled.
To enable incoming calls for Pronto Flash users, they should change this setting: Settings->Dialer->Incoming Calls (Enabled).
-
-
Mail settings
-
Creating user accounts.
After you've installed CommuniGate Pro software, and chose main domain name, you can create user accounts. For this, you should use Users->Domains and choose your domain:
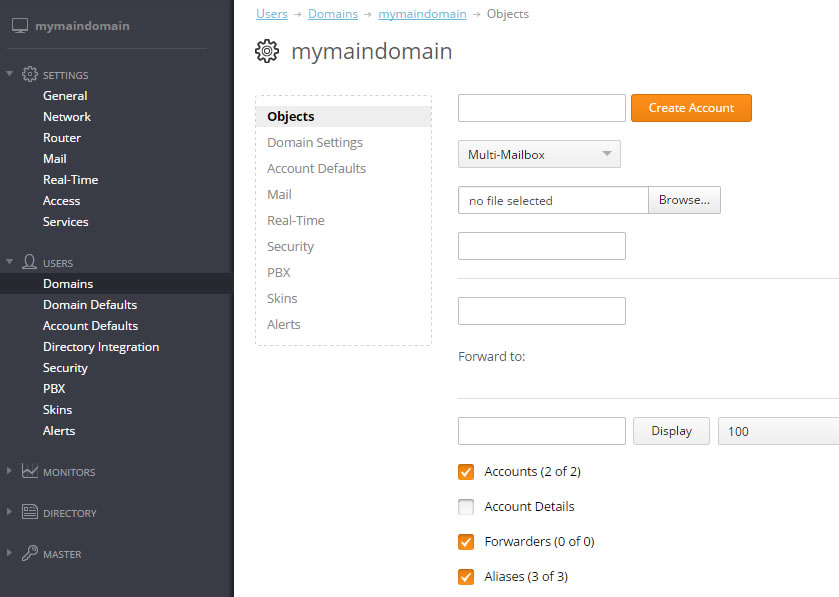
Here you can see two already existing accounts — postmaster — main administration account and pbx — technical account which uses to run voice applications by default, and store default sittings for this voice applications.
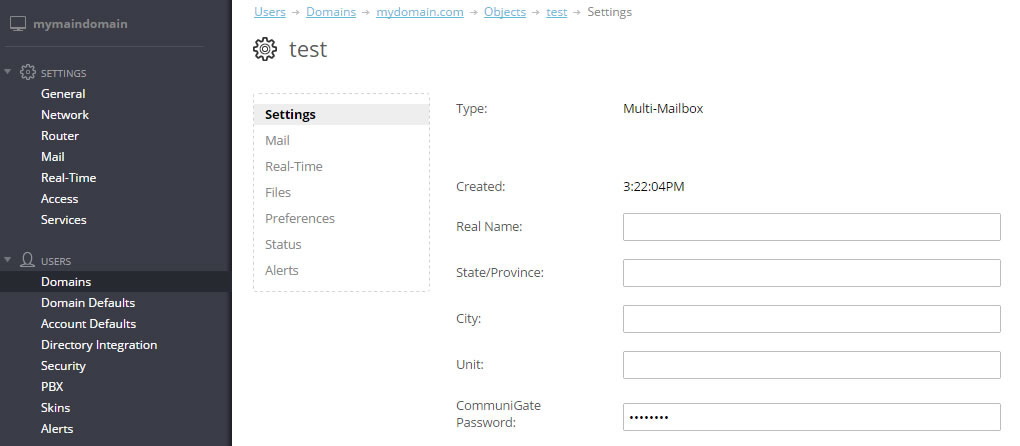
To create user, just simple enter a name for new account in field next to the "Create Account" button, and press this button. You'll get to the page with user settings, where you can set account password in "CommuniGate password" field.
Message receiving
This is the most time consuming setting for mail, mostly because of need of effective spam blocking. On the one hand, you need to block unnecessary mail (for decrease lexical filter load, if it presented, and to decrease overall server load). On the other hand, you shouldn't loose any common senders mail.
DNS
Though, we already can receive mail in created account, you'll need to use IP-address in domain part of receivers name. This very uncomfortable for users, that's why all mail protocols are using DNS.
Main protocol for mail delivery is SMTP. It's used both, between servers, and from clients to servers (but not vice versa).
From now on, the process of delivery of mail from client to server, we'd call submission of mail, and receiving will be called only server to client delivery (in case of SMTP, clients connected to other servers).
MX-type DNS records are needed for correct operation of this protocol. Any of this record contain three fields:
- Mail server name
- Priority
- Service server name
For every name of sever, must exist A-type DNS record.
Record with highest priority considered to be main mail server. All the others - backup servers.
For example:
>nslookup -type=MX google.com

google.com      MX preference = 50, mail exchanger = alt4.aspmx.l.google.com
google.com      MX preference = 10, mail exchanger = aspmx.l.google.com
google.com      MX preference = 20, mail exchanger = alt1.aspmx.l.google.com
google.com      MX preference = 30, mail exchanger = alt2.aspmx.l.google.com
google.com      MX preference = 40, mail exchanger = alt3.aspmx.l.google.com

aspmx.l.google.com      internet address = 74.125.143.26
alt1.aspmx.l.google.com internet address = 173.194.64.26
alt2.aspmx.l.google.com internet address = 74.125.142.26
alt3.aspmx.l.google.com internet address = 74.125.140.26
alt4.aspmx.l.google.com internet address = 173.194.74.26
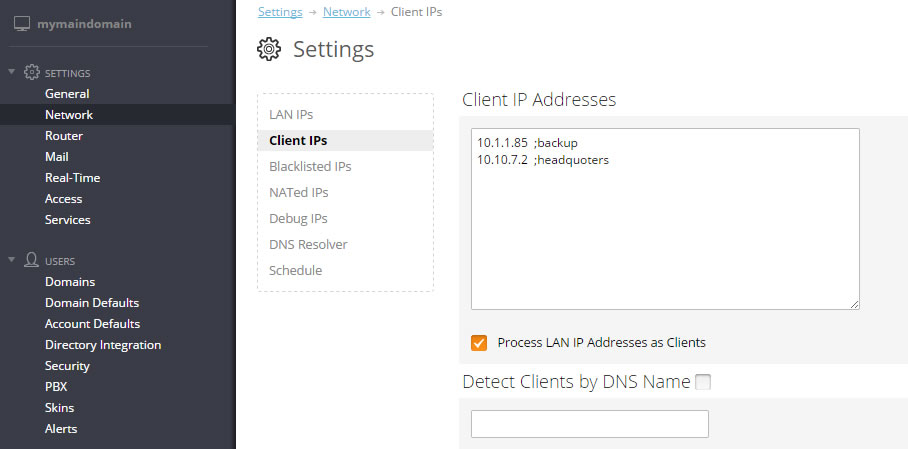
Client IP addresses (Client IPs)
In CommuniGate Pro there is a define of Client addresses. Simply, this is trusted IP addresses - they usually have some privileges compared to common addresses, and in some security settings, you can choose "for clients only" and "for everyone except clients".
In WebAdmin can be set in field "Address list". This type of field are used in many other settings (Setting->Network->Client IPs):
Listeners
Every protocol, which can be used by CommuniGate Pro, have it's own list of listeners (server's objects, creating sockets). For example SMTP (Settings->Mail->SMTP->Receiving->«Listener»):
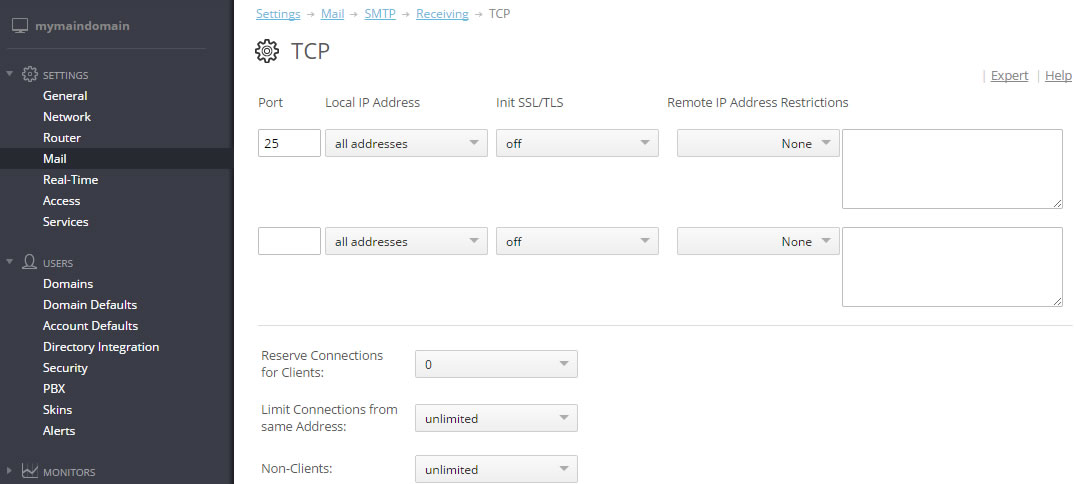
Every listener open sockets on determined port and address. This is useful if you have web-server on the same server with CGPro, because web-server uses port 80 on this IP-address, and CGPro on the other.
By default, in SMTP module set only port 25. Let's add another two, that are needed:
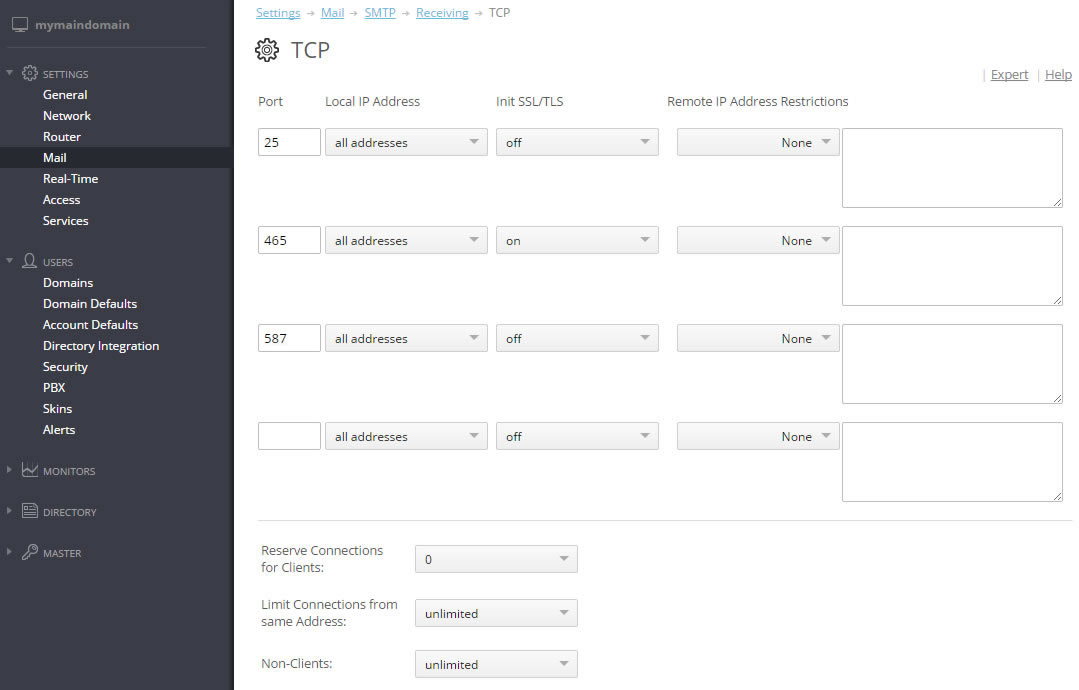
In the latest versions of SMTP, port 25 used mostly by servers. Clients must use port 587, which required authentication (with command SMTP AUTH).
Protection
There are many protocols, besides SMTP, which can be used to submit mail on server,all of them are using account authentication. SMTP in some cases can't use it, because it created to receive mail from any server.
Because of this, we need some actions to prevent spamming.
Relaying
Relaying - is receiving and sending transit mail.
SMTP can submit transit mail for other servers, but it's strongly recommended to disable this feature for all, except trusted accounts. Because if relaying to foreign servers from spammers IP addresses, this servers administrators will block mail from your server.
Relay settings can be found here Settings->Mail->SMTP->Relaying and default settings can be used:

Do not change it without reason.
Header check
When receiving, main header records are MAIL FROM and RCPT TO. Here is an example of SMTP session:
220 mycgpro.com ESMTP CommuniGate Pro 6.0.4 is glad to see you!
helo
250 mycgpro.com domain name should be qualified
Mail from:sender@gmail.com
250 sender@gmail.com sender accepted
rcpt to: recipient@mycgpro.com
250 recipient@mycgpro.com will leave the Internet
data:
354 Enter mail, end with "." on a line by itself
From: Name That Everybody See <tvoya@mama.com>

Tra ta ta Prishli mne deneg na telephon!
.
250 90001 message accepted for delivery
You can see lines MAIL FROM and RCPT TO. The main thing to know: in any mail client, field "From" is just a part of message body, but not a data from header. Most of the header checks (including Remote BlackLists) works with RCPT TO line in header, and do not check message body. If MIME format is used, then sender recorded in "Return-path" field.
(Here is the mail, received with SMTP session in MIME format.)
To check "Return-path", server get domain part of address and checking DNS for record of such domain name. There is even more strong check - Reverse Connect. With this check CGPro connect to server and trying if it'll receive mail for sender in "Return-path" field.
One of the most popular check for "Return-path" is SPF-check. It requires existence of TXT DNS records with special format, called SPF records. They contain mail server name and list of it's IP addresses, which are trusted senders for mail with this domain name. For example:
>nslookup -type=TXT google.com
google.com      text = "v=spf1 include:_spf.google.com ip4:216.73.93.70/31 ip4:216.73.93.72/31~all"
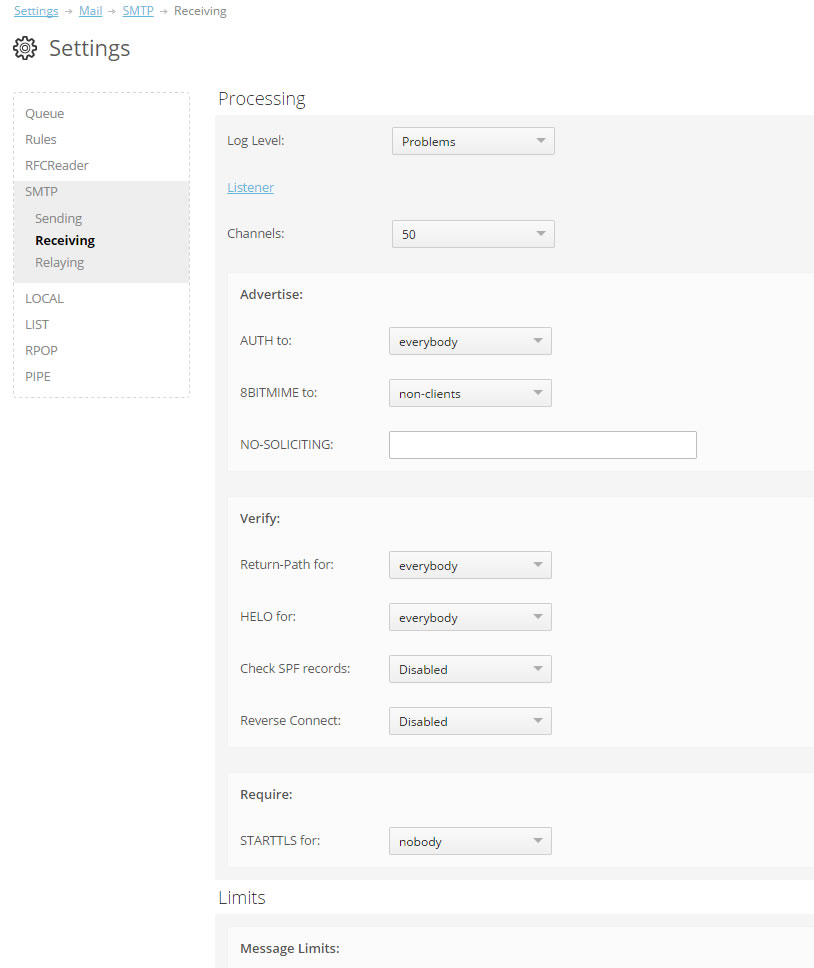
The shortage of this method - not all administrators are using this SPF records. So, not all legitimate mail servers can pass this check. In WebAdmin you can change setiings for receiving mail here Settings->Mail->SMTP->Receiving:
RBL and usual blacklist are commonly known, so lets pass them. There should be no problem with configuring these.
Mail processing
When message is submitted, it's saved on HDD in folder "Queue" of base folder with .tmp extension. As soon as receiving process is completed, extension is changed with .msg and message file transferred to common queue.
In case of unexpected reboot or shutdown of the server, messaged from queue (.msg files) will be loaded to queue again.
Queue
When program module submitted message in queue, the message is waiting in this queue to be delivered to another module or\and in account mailbox.
In queue messages have following actions:
- Sender address conversion and analysis.
- Applying of server common rules.
- Queue file is transferred to one or more logical queues (depends on which processing module is receiving message).
- Applying of domain or user rules.
- Processing messages in receiving modules.
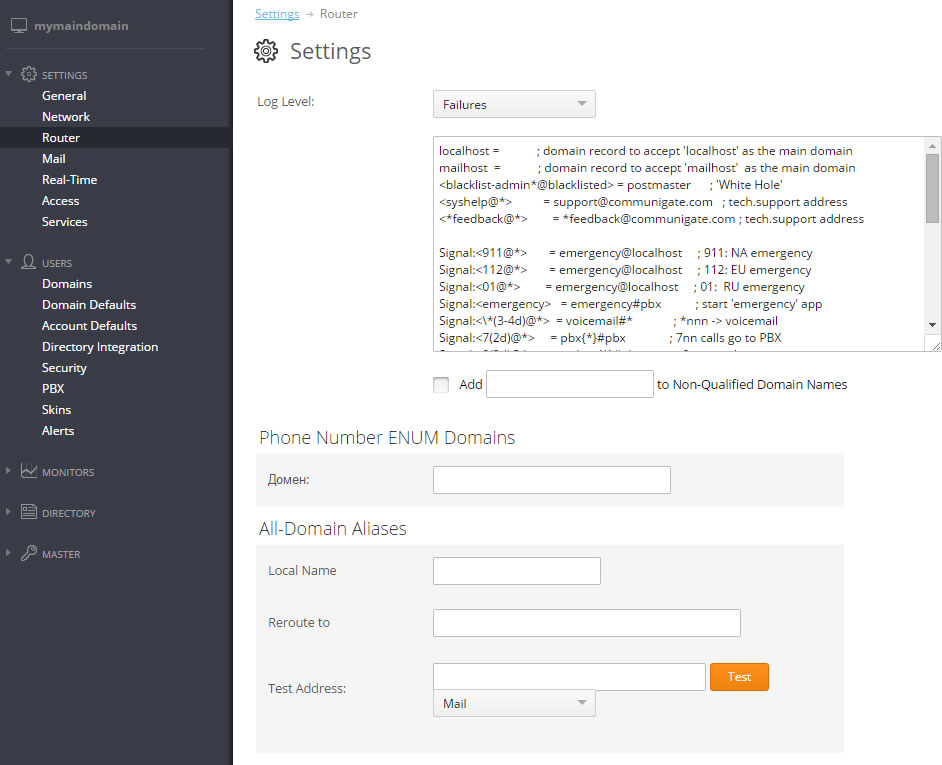
Router
Every time, when CommuniGate Pro get mail address, it is processed through Router module. Besides secondary tools for routing control (such as rules, domain and user aliases, etc.), there is a powerful handy tool, giving access directly to the process of address processing. It's routing table:
Every line in this table have following format:
[relay prefix:][record type prefix:]left=right[; comment]
Every line of table is processed, starting from the top. If address can be converted, using current line, it is converted and processed again from the beginning of the routing table.
By default, records in routing table are designed for all service addresses of the server. Record can be set for three types of operation and should be marked with the appropriate prefix — «Mail», «Access» and «Signal».
There is another one type of prefix - "Relay". If record of this type beginning to work for any receiver, then message will get special mark and will be sent regardless of sender trust level. This is dangerous setting, because it can cause possible spam relaying.
Logical queues
There are four types of message queues — to other SMTP servers (SMTP), to local mailboxes (LOCAL), to third-party software (PIPE) and to mailing lists (LIST).
Every of this queues contains some other queues. For example, there is SMTP queue for every domain-receiver, and there are LOCAL queue for every account. This makes possible to add large heaps of messages with one connection or mailbox appeal.
Rules
Rules are applied in two passes. First of all - server rules for all messages (before adding to queue), and second - domain and user rules, but only for messages in LOCAL queues. In term of internal processing, domain rules are the same as user rules, but they are applied to all domain accounts.
Such rule system means, than domain and user rules can be applied only for incoming messages (outgoing messages doesn't go through LOCAL queue). So, any actions for outgoing messages must be done with server rules.
Connecting to account mailbox
As for sending messages, there are many protocols, which can be used to get content from mailbox, stored on server (POP, IMAP, XIMSS, HTTP (AirSync, WebUser), etc.) But connecting to mailbox almost allays means client authentication.
There are no special actions needed to be done in this section. Everything should work by default.
It is recommended to use full name in client settings, including domain name. If your client, such as MS Outlook, automatically cut domain name after "@", you can use "%" symbol instead.
-
-
Settings VoIP
-
Connecting CommuniGatePro to PSTN gateway and SIP providers.
Analog phone line is still needed for any office, regardless of continuously growing internet voice service usage. So, this is very important to know how to connect SIP/PBX to PSTN.
PSTN gateways usually are common SIP devices. But because of some features of analog phone lines, if user connected directly, there can be some problems:
- Old address format E.164 (for example +123456789) is used in PSTN net, instead of account@domain as for SIP
- Usually authentication is needed for outgoing calls
- Not all gateway are supporting call transferring
- Some of PSTN gateways and SIP providers are set to work with separate SIP devices, and require to get REGISTER requests from time to time, to transfer incoming calls to this device
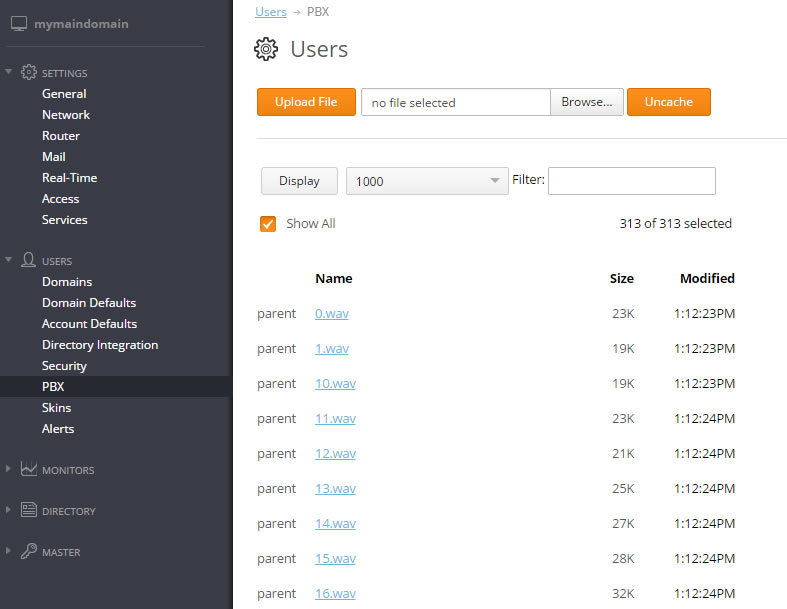
For resolving this problems, CommuniGate Pro have two PBX applications for incoming and outgoing calls from gateways - gatewaycaller and gatewayincoming. Besides, there is a popular application for receiving calls from PTSN networks - pbx. It's have functionality of auto-secretary.
PBX application on CommuniGate Pro server is a program in an interpreted language CG/PL, which can be used as B2BUA. Standard programs have open source, which can be found here: Users->PBX:
Common way to run applications is signal transferring with rule or in routing table to an address like "appName#account@domain" (for example, SIP INVITE).
Receiving calls from PSTN gateway
Largest part of modern gateways can be set to transfer incoming calls to the SIP-device (in our case CGPro). For routing inside CGPro used routing table Settings->Router
For example, we got incoming call from gateway with SIP field To: +74951234567@gateway.company.dom (gateway.company.dom - fake domain, used only for routing calls from gateway). Then we need following line in routing table to transfer calls from phone network to voice menu of auto-secretary
<+74951234567@gateway.company.dom> = pbx#pbx@localhost
Some gateways have another mode for receiving calls from PSTN net. On the call from PSTN, caller hear long signal as like he picked up phone, and he need to dial additional number to get connection.
Of course, such functionality in needed only if there is no IVR presented, and it's recommended to be turned off.
But in this case you still can set a useful routing. Field To: from caller have format like:
nnn@gateway.company.dom, where «nnn» is dialed number
;calls addressed on number (3 digits)@gateway.company.dom going to gatewayincoming,
;digits sent to application as parameter
<(3d)@gateway.company.dom> = gatewayincoming{*}#pbx@localhost
;all the other calls goes to IVR
<*@gateway.company.dom> = pbx#pbx@localhost
Receiving calls from SIP provider
SIP providers and some old or simple PSTN gateways require SIP registration for dialing to SIP-device. In this case, you need to choose account in CGPro which will receive these calls (usually it is pbx account, because all incoming calls to this user are going to IVR). Then you'll need to set RSIP for it:

RSIP settings are exactly the same as settings for common SIP client.
Outgoing calls
Routing for outgoing calls can be very complicated. Let's a simplified example:
- If number begin with 7 and have 11 digits - route it to PSTN gateway 10.1.1.1
- If number begin with 1 and have 11 digits - route it on (fake) SIP provider sip.net
- All of this services require authentication
First of all, authentication settings should be set on both gateways for all accounts on the server:
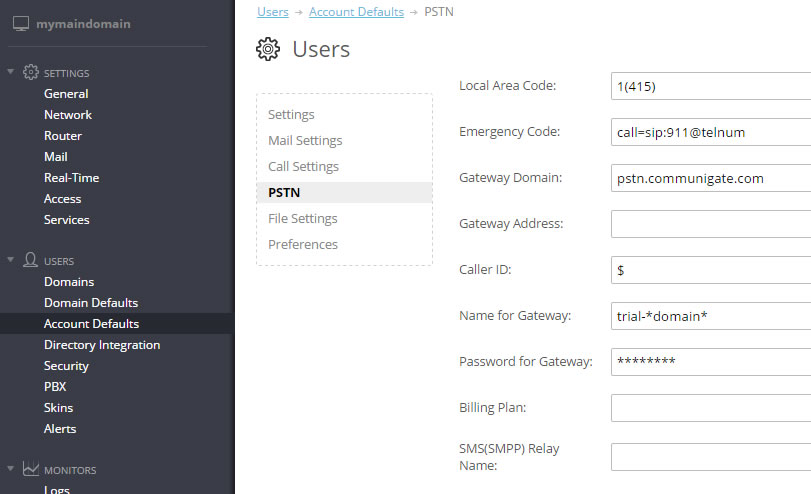
very setting is recorded as setting dictionary, where gateway name is the key, because we have more than one gateway. "$" in CallerID field will be set in account name.
Records in routing table with authentication and this settings looks like:
Signal:<7(10d)@*>=gatewaycaller{+7*,gwru}#pbx
Signal:<1(10d)@*>=gatewaycaller{+1*,gwus}#pbx
Let's explain work of this settings with an example of a call to US.
User dialed number 1(123)456-78-90.
When record is applied, router will get 10 last digits, add +1 as first symbols (number with E.164 format is acceptable with any PSTN provider) and will send final number as first parameter to gatewaycaller application.
After this, gatewaycaller will try to find group of settings with key "gwus" in callers settings, which was send as second parameter.
Record PSTN settings as account settings on the one hand give opportunity for quick change settings for all accounts, and on the other hand, let any user to have its own list of gateways.
Media proxy settings
In case, when data exchange protocols can't be used between devices directly, CGPro server can be used as proxy for this devices. For example, when client device or server have NAT connection, or when it's needed to transfer media data between IPv4 and IPv6 networks, CGPro server creates media-proxy - separated port for transferring data from LAN client to remote system in the Internet, and vice versa. In this case, devices are connected not directly, but through the created media-proxy.
There are possible problems exist, when media proxy used. Such as one-sided hearing or full lack of hearing but with successful connection. This means, there is some reason which blocks media packets, and they are not delivered to one or both of the participants. To avoid such problems, you'll need to check following settings:
1. On the setting page Settings->Network->LAN set correct IPv4 or IPv6 WAN addresses. And LAN server address.
2. Open in Firewall TCP and UDP port range, which is specified in this settings in "Port allocation" fields. This ports are used to create media proxy. Make sure, that Firewall uses 1:1 mode to transfer this ports, in other words, port number is the same when transferred from inside to outside and from outside to inside.

In case, you can't solve a problem, feel free to contact technical support by e-mail support@communigate.ru.
-